The DIYer’s Guide, 5 Steps to Choosing the Right Skirting Boards for Your Home
Taking on a home project yourself is a rewarding experience, and the key to a professional-looking result lies in a careful, step-by-step approach. One of the final details that can make or break a room is the skirting board. Choosing and installing the right skirting boards can seem daunting, but with a clear plan and the right materials, you can achieve a flawless finish that you’ll be proud of. This guide will walk you through the five essential steps to choosing the perfect skirting boards for your home.
Step 1: Understand Your Options, The Material
The first and most important decision for any DIYer is the material. You have two main choices, traditional timber or modern MDF. While timber has its traditional appeal, it can be a difficult material to work with. It’s prone to knots, which can show through paint, and it can warp or twist over time, especially with changes in humidity. For the DIYer, this means extra preparation, sanding, and a risk of the finish not lasting. The modern solution, and the one we highly recommend, is high-quality, moisture-resistant MDF. A premium how much do skirting boards cost is perfectly straight, free from defects, and has a smooth surface that is ideal for painting. This consistency makes it far easier to cut, install, and finish, ensuring a professional result without the hassle.
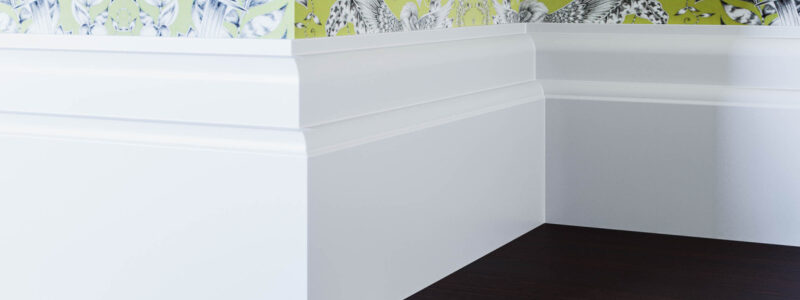
Step 2: Define Your Style, The Profile
The profile of your skirting board is its most important aesthetic feature. It’s what gives the board its character and helps it complement the style of your room. Before you buy, take a moment to define the style you want to achieve. For a modern, minimalist home, a simple, low profile with clean lines, like a Square Edge or Bullnose, will create a sleek, contemporary feel. For a more classic or traditional look, a taller, more decorative profile with intricate curves, like an Ogee or Victorian, will add a touch of historical elegance. The great thing about our extensive collection is that there is a style to suit every vision. Selecting the right MDF skirting boards for your style is a crucial step in defining the character of your space.
Step 3: Get it Right, Measuring and Ordering
A professional finish is all about a perfect fit, and this is where many DIYers run into trouble. Buying standard, off-the-shelf lengths often leads to unnecessary joins and waste. The smart approach is to accurately measure your room and then order boards that are cut to your specific requirements. At MDF Skirting World, every one of our skirting boards is made to order and precision cut. This bespoke approach simplifies the installation process by eliminating the need for you to make complex cuts on site. It also minimises waste and guarantees a perfect fit, which is essential for a seamless and polished result. Getting the right length for your MDF skirting boards will save you time and effort in the long run.
Step 4: Think Long-Term, Durability and Maintenance
As a DIYer, you want your hard work to last. This is why thinking about durability is key. Our MDF skirting boards are made from moisture-resistant MDF, which is specifically engineered to stand up to the fluctuating humidity of the UK climate. Unlike traditional wood, it resists swelling, warping, and cracking, ensuring your finish remains pristine for many years. The smooth, consistent surface also makes painting and cleaning incredibly easy, saving you time and effort on maintenance down the line. This durability makes them a wise, long-term investment in your home’s appearance.
Step 5: Don’t Forget the Details, Matching Architraves
The final touch that separates a good DIY job from a great one is consistency. A truly professional and cohesive interior has skirting boards and architraves that match in style and profile. A mismatched set can disrupt the visual harmony of a room. We offer a selection of matching architraves for all our skirting board styles, ensuring that every detail is in sync. This final step provides a sense of completeness and professionalism that truly sets a room apart.
By following these five simple steps, you can ensure your DIY project results in a flawless, professional, and long-lasting finish that you can be proud of.